
2009 Cadillac Touch Up Paint (50 OEM Colors)
Search for your color
-

White Diamond Pri Metallic Tri-coat
CadillacWhite Diamond Pri Metallic Tri-coat (98/WA800J)
🔥 Ordered 7 times recently -

White Diamond Pearl Tricoat
CadillacWhite Diamond Pearl Tricoat (WA800J/98/GBN/981J)
🔥 Ordered 6 times recently -
Shale (Interior)
CadillacShale (Interior) (WA149B)
🔥 Ordered 5 times recently -

Dark Brahma Jewel Metallic
CadillacDark Brahma Jewel Metallic (12/WA519Q)
🔥 Ordered 2 times recently -

Gold Mist Metallic
CadillacGold Mist Metallic (51/WA316N/WA216N)
🔥 Ordered 2 times recently -

Black
CadillacBlack (41/WA8555)
🔥 Ordered 1 times recently -

Blade Silver Metallic
CadillacBlade Silver Metallic (17U/WA636R)
🔥 Ordered 1 times recently -

Crystal Claret Tricoat
CadillacCrystal Claret Tricoat (89/WA505Q)
🔥 Ordered 1 times recently -

Fine Silver Birch Metallic
CadillacFine Silver Birch Metallic (59/WA926L)
🔥 Ordered 1 times recently -

Kevlar Grey Effect
CadillacKevlar Grey Effect (WA417P)
🔥 Ordered 1 times recently -

Satin Nickel Metallic (Wheel Color)
CadillacSatin Nickel Metallic (Wheel Color) (WA733J)
🔥 Ordered 1 times recently -

Black (matt)
CadillacBlack (matt) (WA848/WA8555)
-

Bright Silver Sparkle Effect (Wheel)
CadillacBright Silver Sparkle Effect (Wheel) (9967)
-

Carbon Flash Metallic
CadillacCarbon Flash Metallic (58/WA501Q)
-

Charcoal Effect (Wheel)
CadillacCharcoal Effect (Wheel) (8945)
-

Cocoa (Interior)
CadillacCocoa (Interior) (WA413P)

For small chips & scratches
Customized Color Paint Pen
Repair tiny chips and scratches with precision. Perfect for small nicks from rocks or door dings, the fine tip applicator makes it easy for beginners to achieve a clean, factory-quality finish.

For Medium-sized Chips & Scratches
Customized Color Paint Bottle
Tackle medium-sized scratches and chips with our Customzied Color Paint Bottle. The built-in applicator brush provides smooth, controlled coverage, while the included basecoat delivers a perfect factory match in your custom paint color.

For larger areas & panel resprays
Customized Color Spray Can
Cover larger areas with a smooth, professional finish using ourcustomized color Spray Can. Designed for hoods, fenders, and larger scratches, this product provides consistent spray coverage and factory-matched color accuracy.

For large repairs & total resprays
Customized Color Professional Size Paint
When your repair job calls for more than a touch-up, step up to our professional-size automotive paints. Available in Pint, Quart, or Gallon sizes, these paints are ready-to-spray using an airless spray gun.

For small chips & scratches
Customized Color Tricoat Paint Pens
Repair tiny chips and scratches with precision. Perfect for small nicks from rocks or door dings, the fine tip applicator makes it easy for beginners to achieve a clean, factory-quality finish. Each order includes a basecoat and a midcoat pen.

For Medium-sized Chips & Scratches
Customized Color Tricoat Paint Bottles
Tackle medium-sized scratches and chips with our Customzied Color Paint Bottles. The built-in applicator brush provides smooth, controlled coverage, while the basecoat & midcoat deliver a perfect factory match in your custom paint color.

For larger areas & panel resprays
Customized Color Tricoat Spray Cans
Cover larger areas with a smooth, professional finish using our customized color basecoat & midcoat Spray Cans. Designed for hoods, fenders, and larger scratches, this product provides consistent spray coverage and factory-matched color accuracy.
For large repairs & total resprays
Customized Color Tricoat Professional Size Paint
When your repair job calls for more than a touch-up, step up to our professional-size automotive paints. Available in Pint, Quart, or Gallon sizes, these paints are ready-to-spray using an airless spray gun. Each order includes a basecoat & a midcoat paint.
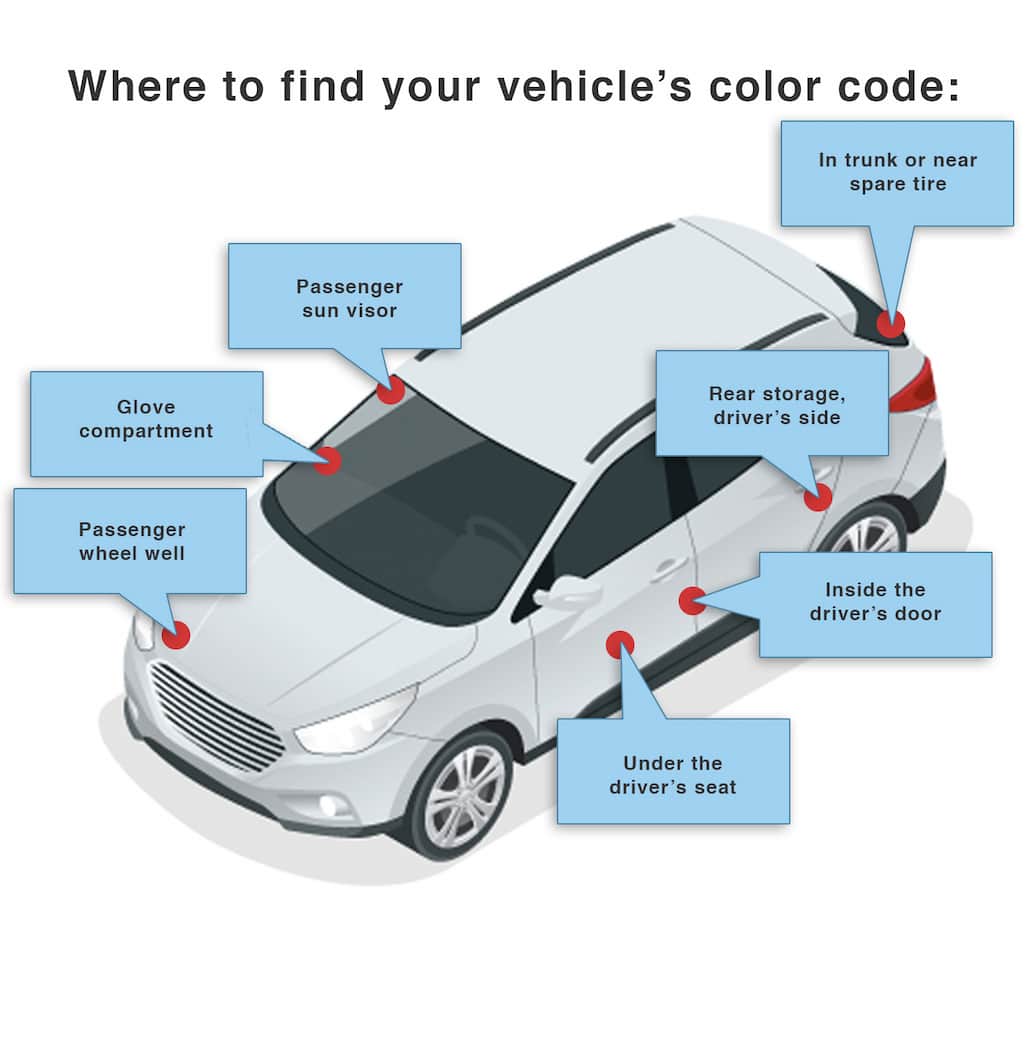
How to Find Your 2009 Cadillac's Color Code
Cadillac used many locations for paint codes, making them hard to find, often impossible. GM (parent company of Cadillac) did not standardize the plate location. Usually the code is in the glove box or the spare tire well; otherwise it may be elsewhere. The typical format is 51/WA316N, usually preceded by BC/CC (e.g., BC/CC 51 or BC/CC 316N). There are two codes in one, and a U or L may precede for Upper or Lower. Two-tone examples: BC/CC U316N or BC/CC L316N.